
Overview
This tutorial is based on your uploaded Final_FaceMask_during_Video.ipynb notebook. It includes dataset loading, preprocessing, MobileNet transfer learning, prediction on still images, face ROI extraction and realtime webcam/video mask-detection logic. All notebook code cells and available output screenshots are placed into this tutorial template so you can refine the explanations later.
data/tutorials.ts. Change the title, text, images, Python code, YouTube link, and download link there.What you will learn
- Prepare a face mask vs no-mask dataset
- Resize and normalize images for MobileNet input
- Build a transfer-learning classifier in TensorFlow/Keras
- Detect face ROI using OpenCV Haar cascade
- Run mask prediction on images and video frames
Suggested tutorial flow
Imports and dataset reading
Load TensorFlow, OpenCV, NumPy, Matplotlib, OS and dataset folders.
Training data creation
Loop through Face_Mask and No_Mask folders, resize images and build arrays.
Transfer learning model
Reuse MobileNet layers and add binary-classification layers.
Still-image prediction
Detect face region and run the trained mask classifier.
Realtime video demo
Apply the same logic frame-by-frame using webcam/video input.
Text explanation template
Notebook-based tutorial material
This tutorial is based on your uploaded Final_FaceMask_during_Video.ipynb notebook. It includes dataset loading, preprocessing, MobileNet transfer learning, prediction on still images, face ROI extraction and realtime webcam/video mask-detection logic. All notebook code cells and available output screenshots are placed into this tutorial template so you can refine the explanations later.
How this page is organized
The page shows the full notebook workflow as tutorial sections. Each code cell is rendered as a separate Python code block. If the notebook cell produced an image, graph, screenshot or display output, it is shown under the matching code block and also in the results gallery.
How to edit this later
Open data/tutorials.ts and edit the object with this tutorial slug. Replace resultImages with your final screenshots, update codeBlocks with cleaned code, change videoUrl to the exact YouTube link, and replace the download URL with your final source-code ZIP or GitHub link.
Images, screenshots and results
Add your result screenshots, graphs, model outputs, detected objects, confusion matrices, or interface snapshots here.
Python code explanation
Use one or more code blocks. After each block, explain what the code does in simple teaching language.
Notebook cell 0: import tensorflow as tf ## pip install tensorflow-gpu
import tensorflow as tf  ## pip install tensorflow-gpu
import cv2 ###  pip install opencv-python
 ## pip install opencv-contrib-python   fullpackage
import os
import matplotlib.pyplot as plt  ## pip install matlplotlib
import numpy as np ## pip install numpy
This code block is extracted from the uploaded Jupyter notebook. Replace or rewrite the explanation later with your final teaching notes for this step.
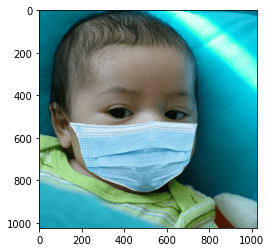
Notebook cell 1: img_array = cv2.imread("Dataset/Face_Mask/00000_Mask.jpg")
img_array = cv2.imread("Dataset/Face_Mask/00000_Mask.jpg")This code block is extracted from the uploaded Jupyter notebook. Replace or rewrite the explanation later with your final teaching notes for this step.
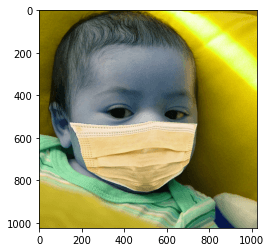
Notebook cell 2: plt.imshow(img_array) ## BGR
plt.imshow(img_array) ## BGR<matplotlib.image.AxesImage at 0x1b592d6bf08>
This code block is extracted from the uploaded Jupyter notebook. Replace or rewrite the explanation later with your final teaching notes for this step.
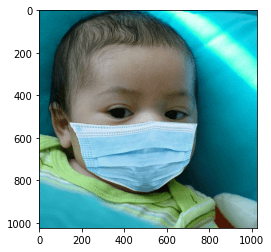
Notebook cell 3: plt.imshow(cv2.cvtColor(img_array, cv2.COLOR_BGR2RGB))
plt.imshow(cv2.cvtColor(img_array, cv2.COLOR_BGR2RGB))<matplotlib.image.AxesImage at 0x1b59322e4c8>
This code block is extracted from the uploaded Jupyter notebook. Replace or rewrite the explanation later with your final teaching notes for this step.
Notebook cell 4: img_array.shape
img_array.shape(1024, 1024, 3)
This code block is extracted from the uploaded Jupyter notebook. Replace or rewrite the explanation later with your final teaching notes for this step.
Notebook cell 5: Datadirectory = "Dataset/" ## training dataset
Datadirectory = "Dataset/"  ## training dataset
Classes = ["Face_Mask","No_Mask"] ## list of classes
for category in Classes:
    path = os.path.join(Datadirectory, category)  ## //
    for img in os.listdir(path):
        img_array = cv2.imread(os.path.join(path,img))
        #backtorgb = cv2.cvtColor(img_array,cv2.COLOR_GRAY2RGB)
        plt.imshow(cv2.cvtColor(img_array, cv2.COLOR_BGR2RGB))
        plt.show()
        break
breakThis code block is extracted from the uploaded Jupyter notebook. Replace or rewrite the explanation later with your final teaching notes for this step.
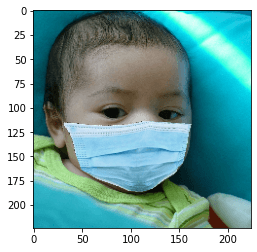
Notebook cell 6: img_size= 224 ## ImageNet => 224 x 224
img_size= 224 ## ImageNet => 224 x 224

new_array= cv2.resize(img_array, (img_size,img_size))
plt.imshow(cv2.cvtColor(new_array, cv2.COLOR_BGR2RGB))
plt.show()This code block is extracted from the uploaded Jupyter notebook. Replace or rewrite the explanation later with your final teaching notes for this step.
Notebook cell 8: training_Data = [] ## data
training_Data = [] ## data

def create_training_Data():
    for category in Classes:
        path = os.path.join(Datadirectory, category)
        class_num = Classes.index(category) ## 0 1,  ## Label
        for img in os.listdir(path):
            try:
                img_array = cv2.imread(os.path.join(path,img))
                new_array= cv2.resize(img_array, (img_size,img_size))
                training_Data.append([new_array,class_num])
            except Exception as e:
                pass
This code block is extracted from the uploaded Jupyter notebook. Replace or rewrite the explanation later with your final teaching notes for this step.
Notebook cell 9: create_training_Data()
create_training_Data()This code block is extracted from the uploaded Jupyter notebook. Replace or rewrite the explanation later with your final teaching notes for this step.
Notebook cell 10: print(len(training_Data))
print(len(training_Data))1951
This code block is extracted from the uploaded Jupyter notebook. Replace or rewrite the explanation later with your final teaching notes for this step.
Notebook cell 11: import random
import random

random.shuffle(training_Data)
This code block is extracted from the uploaded Jupyter notebook. Replace or rewrite the explanation later with your final teaching notes for this step.
Notebook cell 12: X = [] ## data /feature
X = []  ## data /feature
y = []  ## label

for features,label in training_Data:
    X.append(features)
    y.append(label)


X = np.array(X).reshape(-1, img_size, img_size, 3)
This code block is extracted from the uploaded Jupyter notebook. Replace or rewrite the explanation later with your final teaching notes for this step.
Notebook cell 13: X.shape
X.shape(1951, 224, 224, 3)
This code block is extracted from the uploaded Jupyter notebook. Replace or rewrite the explanation later with your final teaching notes for this step.
Notebook cell 14: # normalize the data
# normalize the data
X= X/255.0; ## we are normalizing it
This code block is extracted from the uploaded Jupyter notebook. Replace or rewrite the explanation later with your final teaching notes for this step.
Notebook cell 15: y[1000]
y[1000]1
This code block is extracted from the uploaded Jupyter notebook. Replace or rewrite the explanation later with your final teaching notes for this step.
Notebook cell 16: Y= np.array(y)
Y= np.array(y)This code block is extracted from the uploaded Jupyter notebook. Replace or rewrite the explanation later with your final teaching notes for this step.
Notebook cell 17: import pickle
import pickle

pickle_out = open("X.pickle","wb")
pickle.dump(X, pickle_out)
pickle_out.close()

pickle_out = open("y.pickle","wb")
pickle.dump(y, pickle_out)
pickle_out.close()
This code block is extracted from the uploaded Jupyter notebook. Replace or rewrite the explanation later with your final teaching notes for this step.
Notebook cell 18: pickle_in = open("X.pickle","rb")
pickle_in = open("X.pickle","rb")
X = pickle.load(pickle_in)

pickle_in = open("y.pickle","rb")
y = pickle.load(pickle_in)
This code block is extracted from the uploaded Jupyter notebook. Replace or rewrite the explanation later with your final teaching notes for this step.
Notebook cell 20: import tensorflow as tf
import tensorflow as tf
from tensorflow import keras
from tensorflow.keras import layers
This code block is extracted from the uploaded Jupyter notebook. Replace or rewrite the explanation later with your final teaching notes for this step.
Notebook cell 21: model = tf.keras.applications.mobilenet.MobileNet() ## pre-trained model
model = tf.keras.applications.mobilenet.MobileNet() ## pre-trained modelThis code block is extracted from the uploaded Jupyter notebook. Replace or rewrite the explanation later with your final teaching notes for this step.
Notebook cell 22: model.summary()
model.summary()Model: "mobilenet_1.00_224" _________________________________________________________________ Layer (type) Output Shape Param # ================================================================= input_1 (InputLayer) [(None, 224, 224, 3)] 0 _________________________________________________________________ conv1_pad (ZeroPadding2D) (None, 225, 225, 3) 0 _________________________________________________________________ conv1 (Conv2D) (None, 112, 112, 32) 864 _________________________________________________________________ conv1_bn (BatchNormalization (None, 112, 112, 32) 128 _________________________________________________________________ conv1_relu (ReLU) (None, 112, 112, 32) 0 _________________________________________________________________ conv_dw_1 (DepthwiseConv2D) (None, 112, 112, 32) 288 _________________________________________________________________ conv_dw_1_bn (BatchNormaliza (None, 112, 112, 32) 128 _________________________________________________________________ conv_dw_1_relu (ReLU) (None, 112, 112, 32) 0 _________________________________________________________________ conv_pw_1 (Conv2D) (None, 112, 112, 64) 2048 _________________________________________________________________ conv_pw_1_bn (BatchNormaliza (None, 112, 112, 64) 256 _________________________________________________________________ conv_pw_1_relu (ReLU) (None, 112, 112, 64) 0 _________________________________________________________________ conv_pad_2 (ZeroPadding2D) (None, 113, 113, 64) 0 _________________________________________________________________ conv_dw_2 (DepthwiseConv2D) (None, 56, 56, 64) 576 _________________________________________________________________ conv_dw_2_bn (BatchNormaliza (None, 56, 56, 64) 256 _________________________________________________________________ conv_dw_2_relu (ReLU) (None, 56, 56, 64) 0 _________________________________________________________________ conv_pw_2 (Conv2D) (None, 56, 56, 128) 8192 _________________________________________________________________ conv_pw_2_bn (BatchNormaliza (None, 56, 56, 128) 512 _________________________________________________________________ conv_pw_2_relu (ReLU) ( ... [output shortened for website readability]
This code block is extracted from the uploaded Jupyter notebook. Replace or rewrite the explanation later with your final teaching notes for this step.
Notebook cell 24: base_input = model.layers[0].input
base_input = model.layers[0].inputThis code block is extracted from the uploaded Jupyter notebook. Replace or rewrite the explanation later with your final teaching notes for this step.
Notebook cell 25: base_output= model.layers[-4].output
base_output= model.layers[-4].outputThis code block is extracted from the uploaded Jupyter notebook. Replace or rewrite the explanation later with your final teaching notes for this step.
Notebook cell 26: Flat_layer= layers.Flatten()(base_output)
Flat_layer=  layers.Flatten()(base_output)
final_output = layers.Dense(1)(Flat_layer) ## 0 ,1
final_ouput = layers.Activation('sigmoid')(final_output)
This code block is extracted from the uploaded Jupyter notebook. Replace or rewrite the explanation later with your final teaching notes for this step.
Notebook cell 27: new_model = keras.Model(inputs = base_input, outputs= final_output)
new_model = keras.Model(inputs = base_input, outputs= final_output)This code block is extracted from the uploaded Jupyter notebook. Replace or rewrite the explanation later with your final teaching notes for this step.
Notebook cell 28: new_model.summary()
new_model.summary()Model: "model" _________________________________________________________________ Layer (type) Output Shape Param # ================================================================= input_1 (InputLayer) [(None, 224, 224, 3)] 0 _________________________________________________________________ conv1_pad (ZeroPadding2D) (None, 225, 225, 3) 0 _________________________________________________________________ conv1 (Conv2D) (None, 112, 112, 32) 864 _________________________________________________________________ conv1_bn (BatchNormalization (None, 112, 112, 32) 128 _________________________________________________________________ conv1_relu (ReLU) (None, 112, 112, 32) 0 _________________________________________________________________ conv_dw_1 (DepthwiseConv2D) (None, 112, 112, 32) 288 _________________________________________________________________ conv_dw_1_bn (BatchNormaliza (None, 112, 112, 32) 128 _________________________________________________________________ conv_dw_1_relu (ReLU) (None, 112, 112, 32) 0 _________________________________________________________________ conv_pw_1 (Conv2D) (None, 112, 112, 64) 2048 _________________________________________________________________ conv_pw_1_bn (BatchNormaliza (None, 112, 112, 64) 256 _________________________________________________________________ conv_pw_1_relu (ReLU) (None, 112, 112, 64) 0 _________________________________________________________________ conv_pad_2 (ZeroPadding2D) (None, 113, 113, 64) 0 _________________________________________________________________ conv_dw_2 (DepthwiseConv2D) (None, 56, 56, 64) 576 _________________________________________________________________ conv_dw_2_bn (BatchNormaliza (None, 56, 56, 64) 256 _________________________________________________________________ conv_dw_2_relu (ReLU) (None, 56, 56, 64) 0 _________________________________________________________________ conv_pw_2 (Conv2D) (None, 56, 56, 128) 8192 _________________________________________________________________ conv_pw_2_bn (BatchNormaliza (None, 56, 56, 128) 512 _________________________________________________________________ conv_pw_2_relu (ReLU) (None, 56, 56, ... [output shortened for website readability]
This code block is extracted from the uploaded Jupyter notebook. Replace or rewrite the explanation later with your final teaching notes for this step.
Notebook cell 30: new_model.compile(loss="binary_crossentropy", optimizer = "adam", metrics = ["accurac...
new_model.compile(loss="binary_crossentropy", optimizer = "adam", metrics = ["accuracy"])This code block is extracted from the uploaded Jupyter notebook. Replace or rewrite the explanation later with your final teaching notes for this step.
Notebook cell 32: new_model.save('my_model3.h5')
new_model.save('my_model3.h5') This code block is extracted from the uploaded Jupyter notebook. Replace or rewrite the explanation later with your final teaching notes for this step.
Notebook cell 33: new_model = tf.keras.models.load_model('my_model.h5')
new_model = tf.keras.models.load_model('my_model.h5')This code block is extracted from the uploaded Jupyter notebook. Replace or rewrite the explanation later with your final teaching notes for this step.
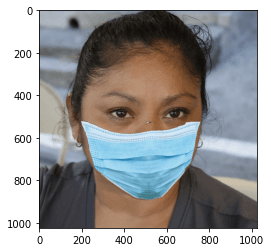
Notebook cell 35: frame = cv2.imread('00002_Mask.jpg')
frame = cv2.imread('00002_Mask.jpg')This code block is extracted from the uploaded Jupyter notebook. Replace or rewrite the explanation later with your final teaching notes for this step.
Notebook cell 36: plt.imshow(cv2.cvtColor(frame, cv2.COLOR_BGR2RGB))
plt.imshow(cv2.cvtColor(frame, cv2.COLOR_BGR2RGB))<matplotlib.image.AxesImage at 0x1b5ada5e988>
This code block is extracted from the uploaded Jupyter notebook. Replace or rewrite the explanation later with your final teaching notes for this step.
Notebook cell 37: final_image =cv2.resize(frame, (224,224))
final_image =cv2.resize(frame, (224,224))
final_image =  np.expand_dims(final_image,axis =0)  ## need fourth dimension
final_image=final_image/255.0
This code block is extracted from the uploaded Jupyter notebook. Replace or rewrite the explanation later with your final teaching notes for this step.
Notebook cell 38: Predictions =new_model.predict(final_image)
Predictions =new_model.predict(final_image)This code block is extracted from the uploaded Jupyter notebook. Replace or rewrite the explanation later with your final teaching notes for this step.
Notebook cell 39: Predictions
Predictionsarray([[-55.494904]], dtype=float32)
This code block is extracted from the uploaded Jupyter notebook. Replace or rewrite the explanation later with your final teaching notes for this step.
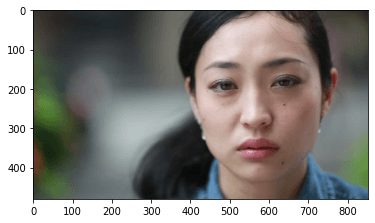
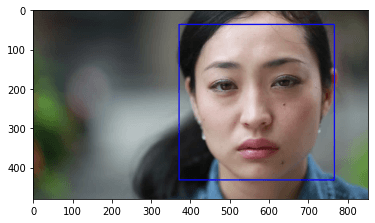
Notebook cell 41: frame = cv2.imread('sad_women.jpg')
frame = cv2.imread('sad_women.jpg')This code block is extracted from the uploaded Jupyter notebook. Replace or rewrite the explanation later with your final teaching notes for this step.
Notebook cell 42: frame.shape
frame.shape(480, 852, 3)
This code block is extracted from the uploaded Jupyter notebook. Replace or rewrite the explanation later with your final teaching notes for this step.
Notebook cell 43: plt.imshow(cv2.cvtColor(frame, cv2.COLOR_BGR2RGB))
plt.imshow(cv2.cvtColor(frame, cv2.COLOR_BGR2RGB))<matplotlib.image.AxesImage at 0x1b5f33aa7c8>
This code block is extracted from the uploaded Jupyter notebook. Replace or rewrite the explanation later with your final teaching notes for this step.
Notebook cell 44: faceCascade = cv2.CascadeClassifier(cv2.data.haarcascades + 'haarcascade_frontalface_...
faceCascade = cv2.CascadeClassifier(cv2.data.haarcascades + 'haarcascade_frontalface_default.xml')This code block is extracted from the uploaded Jupyter notebook. Replace or rewrite the explanation later with your final teaching notes for this step.
Notebook cell 45: gray = cv2.cvtColor(frame, cv2.COLOR_BGR2GRAY)
gray = cv2.cvtColor(frame, cv2.COLOR_BGR2GRAY)This code block is extracted from the uploaded Jupyter notebook. Replace or rewrite the explanation later with your final teaching notes for this step.
Notebook cell 46: gray.shape
gray.shape(480, 852)
This code block is extracted from the uploaded Jupyter notebook. Replace or rewrite the explanation later with your final teaching notes for this step.
Notebook cell 47: faces = faceCascade.detectMultiScale(gray,1.1,4)
faces = faceCascade.detectMultiScale(gray,1.1,4)
for x,y,w,h in faces:
    roi_gray = gray[y:y+h, x:x+w]
    roi_color = frame[y:y+h, x:x+w]
    cv2.rectangle(frame, (x, y), (x+w, y+h), (255, 0, 0), 2)
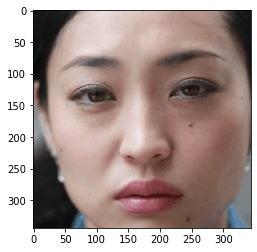
    facess = faceCascade.detectMultiScale(roi_gray)
    if len(facess) == 0:
        print("Face  not detected")
    else:
        for (ex,ey,ew,eh) in facess:
            face_roi = roi_color[ey: ey+eh, ex:ex + ew]
This code block is extracted from the uploaded Jupyter notebook. Replace or rewrite the explanation later with your final teaching notes for this step.
Notebook cell 48: plt.imshow(cv2.cvtColor(frame, cv2.COLOR_BGR2RGB))
plt.imshow(cv2.cvtColor(frame, cv2.COLOR_BGR2RGB))<matplotlib.image.AxesImage at 0x1b5eeee8648>
This code block is extracted from the uploaded Jupyter notebook. Replace or rewrite the explanation later with your final teaching notes for this step.
Notebook cell 49: plt.imshow(cv2.cvtColor(face_roi, cv2.COLOR_BGR2RGB))
plt.imshow(cv2.cvtColor(face_roi, cv2.COLOR_BGR2RGB))<matplotlib.image.AxesImage at 0x1b5eef53488>
This code block is extracted from the uploaded Jupyter notebook. Replace or rewrite the explanation later with your final teaching notes for this step.
Notebook cell 50: final_image =cv2.resize(face_roi, (224,224))
final_image =cv2.resize(face_roi, (224,224))
final_image =  np.expand_dims(final_image,axis =0)  ## need fourth dimension
final_image=final_image/255.0
This code block is extracted from the uploaded Jupyter notebook. Replace or rewrite the explanation later with your final teaching notes for this step.
Notebook cell 51: Predictions =new_model.predict(final_image)
Predictions =new_model.predict(final_image)This code block is extracted from the uploaded Jupyter notebook. Replace or rewrite the explanation later with your final teaching notes for this step.
Notebook cell 52: Predictions
Predictionsarray([[38.855743]], dtype=float32)
This code block is extracted from the uploaded Jupyter notebook. Replace or rewrite the explanation later with your final teaching notes for this step.
Notebook cell 55: import cv2 ### pip install opencv-python
import cv2 ###  pip install opencv-python
 ## pip install opencv-contrib-python   fullpackage
#from deepface import DeepFace  ## pip install deepface
path = "haarcascade_frontalface_default.xml"
font_scale = 1.5
font = cv2.FONT_HERSHEY_PLAIN

# set the rectangle background to white
rectangle_bgr = (255, 255, 255)
# make a black image
img = np.zeros((500, 500))
# set some text
text = "Some text in a box!"
# get the width and height of the text box
(text_width, text_height) = cv2.getTextSize(text, font, fontScale=font_scale, thickness=1)[0]
# set the text start position
text_offset_x = 10
text_offset_y = img.shape[0] - 25
# make the coords of the box with a small padding of two pixels
box_coords = ((text_offset_x, text_offset_y), (text_offset_x + text_width + 2, text_offset_y - text_height - 2))
cv2.rectangle(img, box_coords[0], box_coords[1], rectangle_bgr, cv2.FILLED)
cv2.putText(img, text, (text_offset_x, text_offset_y), font, fontScale=font_scale, color=(0, 0, 0), thickness=1)

cap = cv2.VideoCapture(1)
# Check if the webcam is opened correctly
if not cap.isOpened():
    cap = cv2.VideoCapture(0)
if not cap.isOpened():
    raise IOError("Cannot open webcam")

while True:
    ret,frame = cap.read()
    #eye_cascade = cv2.CascadeClassifier(cv2.data.haarcascades +'haarcascade_eye.xml')
    faceCascade = cv2.CascadeClassifier(cv2.data.haarcascades + 'haarcascade_frontalface_default.xml')
    gray = cv2.cvtColor(frame, cv2.COLOR_BGR2GRAY)
    #print(faceCascade.empty())
    faces = faceCascade.detectMultiScale(gray,1.1,4)
    for x,y,w,h in faces:
        roi_gray = gray[y:y+h, x:x+w]
        roi_color = frame[y:y+h, x:x+w]
        cv2.rectangle(frame, (x, y), (x+w, y+h), (255, 0, 0), 2)
        facess = faceCascade.detectMultiScale(roi_gray)
        if len(facess) == 0:
            print("Face  not detected")
        else:
            for (ex,ey,ew,eh) in facess:
                face_roi = roi_color[ey: ey+eh, ex:ex + ew] ## cropping the face

    final_image =cv2.resize(face_roi, (224,224))
    final_image =  np.expand_dims(final_image,axis =0)  ## need fourth dimension
    final_image=final_image/255.0

    font = cv2.FONT_HERSHEY_SIMPLEX

    Predictions = new_model.predict(final_image)

    font_scale = 1.5
    font = cv2.FONT_HERSHEY_PLAIN


    if (Predictions>0):
        status = "No Mask"

        x1,y1,w1,h1 = 0,0,175,75
        # Draw black background rectangle
        cv2.rectangle(frame, (x1, x1), (x1 + w1, y1 + h1), (0,0,0), -1)
        # Add text
        cv2.putText(frame, status, (x1 + int(w1/10),y1 + int(h1/2)), cv2.FONT_HERSHEY_SIMPLEX, 0.7, (0,0,255), 2)

        cv2.putText(frame,status,(100, 150),font, 3,(0, 0, 255),2,cv2.LINE_4)

        cv2.rectangle(frame, (x, y), (x+w, y+h), (0, 0, 255))
    else:
        status = "Face Mask"

        x1,y1,w1,h1 = 0,0,175,75
        # Draw black background rectangle
        cv2.rectangle(frame, (x1, x1), (x1 + w1, y1 + h1), (0,0,0), -1)
        # Add text
        cv2.putText(frame, status, (x1 + int(w1/10),y1 + int(h1/2)), cv2.FONT_HERSHEY_SIMPLEX, 0.7, (0,255,0), 2)
        cv2.putText(frame,status,(100, 150),font, 3,(0, 255,0),2,cv2.LINE_4)
        cv2.rectangle(frame, (x, y), (x+w, y+h), (0, 255,0))

    #gray = cv2.cvtColor(frame, cv2.COLOR_BGR2GRAY)
    #print(faceCascade.empty())
    #faces = faceCascade.detectMultiScale(gray,1.1,4)

    # Draw a rectangle around the faces
    #for(x, y, w, h) in faces:
      #  cv2.rectangle(frame, (x, y), (x+w, y+h), (0, 255, 0), 2)


    # Use putText() method for
    # inserting text on video

    cv2.imshow('Face Mask Detection Tutorial',frame)

    if cv2.waitKey(2) & 0xFF == ord('q'):
        break

cap.release()
cv2.destroyAllWindows()Face not detected
Face not detected
Face not detected
Face not detected
Face not detected
Face not detected
Face not detected
Face not detected
Face not detected
Face not detected
Face not detected
Face not detected
Face not detected
Face not detected
Face not detected
Face not detected
Face not detected
Face not detected
Face not detected
Face not detected
Face not detected
Face not detected
Face not detected
Face not detected
Face not detected
Face not detected
Face not detected
Face not detected
Face not detected
Face not detected
Face not detected
Face not detected
Face not detected
Face not detected
Face not detected
Face not detected
Face not detected
Face not detected
Face not detected
KeyboardInterrupt:
[1;31m---------------------------------------------------------------------------
[1;31mKeyboardInterrupt Traceback (most recent call last)
[1;32m<ipython-input-56-9611355ee83c> in <module>[1;34m
53 font [1;33m= cv2[1;33m.FONT_HERSHEY_SIMPLEX[1;33m[1;33m
54 [1;33m
[1;32m---> 55[1;33m Predictions [1;33m= new_model[1;33m.predict[1;33m(final_image[1;33m)[1;33m[1;33m
56 [1;33m
57 font_scale [1;33m= [1;36m1.5[1;33m[1;33m
[1;32mC:\ProgramData\Anaconda3\lib\site-packages\tensorflow_core\python\keras\engine\training.py in predict[1;34m(self, x, batch_size, verbose, steps, callbacks, max_queue_size, workers, use_multiprocessing)
907 max_queue_size[1;33m=max_queue_size[1;33m,[1;33m[1;33m
908 workers[1;33m=workers[1;33m,[1;33m[1;33m
[1;32m--> 909[1;33m use_multiprocessing=use_multiprocessing)
910 [1;33m
911 [1;32mdef reset_metrics[1;33m(self[1;33m)[1;33m:[1;33m[1;33m
[1;32mC:\ProgramData\Anaconda3\lib\site-packages\tensorflow_core\python\keras\engine\training_v2.py in predict[1;34m(self, model, x, batch_size, verbose, steps, callbacks, **kwargs)
460 return self._model_iteration(
461 model[1;33m, ModeKeys[1;33m.PREDICT[1;33m, x[1;33m=x[1;33m, batch_size[1;33m=batch_size[1;33m, verbose[1;33m=verbose[1;33m,[1;33m[1;33m
[1;32m--> 462[1;33m steps=steps, callbacks=callbacks, **kwargs)
463 [1;33m
464 [1;33m
[1;32mC:\ProgramData\Anaconda3\lib\site-packages\tensorflow_core\python\keras\engine\training_v2.py in _model_iteration[1;34m(self, model, mode, x, y, batch_size, verbose, sample_weight, steps, callbacks, **kwargs)
394 sample_weights[1;33m=sample_weight[1;
... [output shortened for website readability]This code block is extracted from the uploaded Jupyter notebook. Replace or rewrite the explanation later with your final teaching notes for this step.
Notebook cell 57: import winsound
import winsound
frequency = 2500  # Set Frequency To 2500 Hertz
duration = 1000  # Set Duration To 1000 ms == 1 second

import cv2 ###  pip install opencv-python
 ## pip install opencv-contrib-python   fullpackage
#from deepface import DeepFace  ## pip install deepface
path = "haarcascade_frontalface_default.xml"
font_scale = 1.5
font = cv2.FONT_HERSHEY_PLAIN

# set the rectangle background to white
rectangle_bgr = (255, 255, 255)
# make a black image
img = np.zeros((500, 500))
# set some text
text = "Some text in a box!"
# get the width and height of the text box
(text_width, text_height) = cv2.getTextSize(text, font, fontScale=font_scale, thickness=1)[0]
# set the text start position
text_offset_x = 10
text_offset_y = img.shape[0] - 25
# make the coords of the box with a small padding of two pixels
box_coords = ((text_offset_x, text_offset_y), (text_offset_x + text_width + 2, text_offset_y - text_height - 2))
cv2.rectangle(img, box_coords[0], box_coords[1], rectangle_bgr, cv2.FILLED)
cv2.putText(img, text, (text_offset_x, text_offset_y), font, fontScale=font_scale, color=(0, 0, 0), thickness=1)

cap = cv2.VideoCapture(1)
# Check if the webcam is opened correctly
if not cap.isOpened():
    cap = cv2.VideoCapture(0)
if not cap.isOpened():
    raise IOError("Cannot open webcam")

while True:
    ret,frame = cap.read()
    #eye_cascade = cv2.CascadeClassifier(cv2.data.haarcascades +'haarcascade_eye.xml')
    faceCascade = cv2.CascadeClassifier(cv2.data.haarcascades + 'haarcascade_frontalface_default.xml')
    gray = cv2.cvtColor(frame, cv2.COLOR_BGR2GRAY)
    #print(faceCascade.empty())
    faces = faceCascade.detectMultiScale(gray,1.1,4)
    for x,y,w,h in faces:
        roi_gray = gray[y:y+h, x:x+w]
        roi_color = frame[y:y+h, x:x+w]
        cv2.rectangle(frame, (x, y), (x+w, y+h), (255, 0, 0), 2)
        facess = faceCascade.detectMultiScale(roi_gray)
        if len(facess) == 0:
            print("Face  not detected")
        else:
            for (ex,ey,ew,eh) in facess:
                face_roi = roi_color[ey: ey+eh, ex:ex + ew] ## cropping the face

    final_image =cv2.resize(face_roi, (224,224))
    final_image =  np.expand_dims(final_image,axis =0)  ## need fourth dimension
    final_image=final_image/255.0

    font = cv2.FONT_HERSHEY_SIMPLEX

    Predictions = new_model.predict(final_image)

    font_scale = 1.5
    font = cv2.FONT_HERSHEY_PLAIN


    if (Predictions>0):
        status = "No Mask"

        x1,y1,w1,h1 = 0,0,175,75
        # Draw black background rectangle
        cv2.rectangle(frame, (x1, x1), (x1 + w1, y1 + h1), (0,0,0), -1)
        # Add text
        cv2.putText(frame, status, (x1 + int(w1/10),y1 + int(h1/2)), cv2.FONT_HERSHEY_SIMPLEX, 0.7, (0,0,255), 2)

        cv2.putText(frame,status,(100, 150),font, 3,(0, 0, 255),2,cv2.LINE_4)

        cv2.rectangle(frame, (x, y), (x+w, y+h), (0, 0, 255))
        winsound.Beep(frequency, duration)
    else:
        status = "Face Mask"

        x1,y1,w1,h1 = 0,0,175,75
        # Draw black background rectangle
        cv2.rectangle(frame, (x1, x1), (x1 + w1, y1 + h1), (0,0,0), -1)
        # Add text
        cv2.putText(frame, status, (x1 + int(w1/10),y1 + int(h1/2)), cv2.FONT_HERSHEY_SIMPLEX, 0.7, (0,255,0), 2)
        cv2.putText(frame,status,(100, 150),font, 3,(0, 255,0),2,cv2.LINE_4)
        cv2.rectangle(frame, (x, y), (x+w, y+h), (0, 255,0))

    #gray = cv2.cvtColor(frame, cv2.COLOR_BGR2GRAY)
    #print(faceCascade.empty())
    #faces = faceCascade.detectMultiScale(gray,1.1,4)

    # Draw a rectangle around the faces
    #for(x, y, w, h) in faces:
      #  cv2.rectangle(frame, (x, y), (x+w, y+h), (0, 255, 0), 2)


    # Use putText() method for
    # inserting text on video

    cv2.imshow('Face Mask Detection Tutorial',frame)

    if cv2.waitKey(2) & 0xFF == ord('q'):
        break

cap.release()
cv2.destroyAllWindows()Face not detected Face not detected Face not detected Face not detected Face not detected Face not detected Face not detected Face not detected Face not detected Face not detected Face not detected Face not detected Face not detected Face not detected Face not detected Face not detected Face not detected Face not detected Face not detected Face not detected Face not detected Face not detected Face not detected Face not detected Face not detected Face not detected Face not detected Face not detected Face not detected Face not detected Face not detected Face not detected Face not detected Face not detected Face not detected Face not detected Face not detected Face not detected Face not detected Face not detected Face not detected Face not detected Face not detected Face not detected Face not detected Face not detected Face not detected Face not detected Face not detected Face not detected Face not detected Face not detected Face not detected Face not detected Face not detected Face not detected Face not detected Face not detected Face not detected Face not detected
This code block is extracted from the uploaded Jupyter notebook. Replace or rewrite the explanation later with your final teaching notes for this step.
Download source code
Use this area to provide the complete source code, GitHub repository, Google Drive ZIP, notebook, dataset, or premium download link.
Download Notebook / Source Code